New Windows for the Bathroom

Nick and I pulled the windows in the 2nd floor bathroom a couple weeks ago. We also rebuilt the wall to stabilize it and to add in a third window. Having gone through all the options for replacing the windows, I’m really excited about this new plan. Nick did an outstanding job refinishing the existing windows, and built a matching third. Reusing the windows will help maintain the historic nature of the house and will look great.

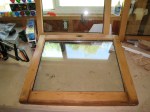
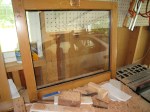
The existing windows are “awning” style windows that tip in from the top. They are simple, and actually can be completely removed from the frame for cleaning (or to get out in an emergency). I love the simple design of these and am happy to be able to keep them. Putting in vinyl windows, while supposedly more efficient and water resistant would have looked bad and cost more. In fact, in pricing replacement windows, I’ve found that they run about $1000 per windows whether you go for super energy efficient ones or fancy all wood ones. Anything less than either would be a waste of money and at that cost it would take about 40 years to pay off the replacement in utility savings. Low-e, double-glazed glass may be great for new construction, where the house is much more insulated, but just repairing the old windows and sealing the frames can get you noticeable increase in efficiency at a fraction of the cost of replacement. Fine Homebuilding even posted an article and blog post about this.

Insulating the Attic

The Bathroom Project which led into removing old insulation and rewiring, now is almost back on track to focus on the bathroom. Over the last month L and I installed new denim insulation into the attic crawlspace next to the bathroom. What a difference it makes!

I spent quite a while researching insulation options, including a really helpful article in Fine Homebuilding (November, 2009) about how insulation works. What I got from that was that spray-foam would be the most efficient, cellulose-type second most efficient and fiberglass least efficient. I couldn’t do spray-foam because I don’t have full walls. The back of the wall and the top floor of the crawl space are unfinished, of course. Also, spray-foam would make it hard (I’m guessing) to add wiring or pipes down the road. And the more I thought about it the less I wanted to work with fiberglass. My choice was to pay a pro to install fiberglass or we could install cellulose ourselves.

I saw the denim batting at a friend’s house and it looked soft enough to sleep on. Comparing the costs and thinking about what I wanted in there, I really prefer something less harmful and less toxic. There’s a local resource (EcoHaus) for Bonded Logic’s UltraTouch Natural Cotton Batt insulation. L called them up and got a quote. The price was reasonable and they deliver. Easy to get. They even got  it here in two days. Continue reading “Insulating the Attic”

Discovering New Old Hardware

One of the fun things about remodeling an old house is seeing all the ways previous owners have gone about solving problems. During my workings I’ve come across some hardware that I’d never seen or heard of before.

I just finished rewiring (almost) all the second floor outlets and (almost) all the first floor overhead lights. This wasn’t really in the plan. While working on the second floor bathroom remodel, I discovered that the crawl space between the bath and the roof line was filled with old (probably 50’s) rock wool insulation with knob-and-tube wiring running through it. These days, code does not allow you to insulate (with any kinds of insulation) over knob-and-tube. It’s a fire hazard. So I decided that we needed to fix this. That meant removing the old insulation. (Incidentally, Fine Homebuilding suggests that it’s fine to leave it there and just add more insulation over it. Oh well.) Then I needed to replace all the knob and tube that was in the crawl space. Turns out it’s all the original wiring for the house overhead fixtures and second floor outlets.

So, I went around the house and over the past several months replaced a fixture or run at a time. This turned out to be extra difficult when the original bungalow was built with joists going inline with the peak of the current roof. So a later addition added cross beams and proper joists in the new area. Oh and all my first floor ceilings are 10-12 inches below the original ceiling but still plastered. Of course I didn’t want to make holes in the ceiling or walls if I didn’t have to.

Ceiling mount bracket

To support the fixtures that were suspended in these sub-ceilings, they installed brackets that can be nailed or screwed into the joists. Fortunately the sub-ceiling also has joists running through it. There are two types of brackets I found. The one at right was more common. As you can see the bracket is a metal rod on which a triangular nut can slide. The movable nut allows the ceiling box to be attached at any point between the studs.

Sleeve and nut
Sleeve and nut for ceiling mount

You put the ceiling box over the nut (through the center knockout in the box) and attach a sleeve that has a whole in the back to line up with the nut. Then screen in the set screw which acts to hold the ceiling box on the bracket and sets against the rod so that the nut doesn’t slide any more.

Of course once I had seen this a few times I discovered it at my neighborhood True Value. They still make similar brackets. I’m sure, if I ever install overhead fixtures elsewhere, that I’m likely to end up using one some day.

Rats in the Attic

A few years ago our dog got all wigged out in the fall and we realized it was because there were rats in the house. They don’t call it Rat City for nothing. I didn’t worry about it too much until they got out of the walls and into the living space. Then the war was on. And every fall I set out new traps and they leave (after I catch a couple).

Of course I also put heavy duty hardware cloth over anything along the roof lines that looked like a whole. This seems to have helped keep them out of the walls (the crawl space is a different issue).

IMG_0477While working on The Bathroom Project I found that in the crawlspace behind the tub wall was knob-and-tube wiring covered with old cellulose insulation (there’s a whole other post that I’ll devote to that some day). The insulation wasn’t doing much good and was clearly a fire hazard so L and I took a couple days to clean it out. That’s got to be the dirtiest job I’ve ever done.

While digging in the corners I found a huge rats nest. Not like a lot of wires together (there were a few of those). A real rats nest. It clearly hadn’t been used in years (since I plugged up their access holes) but it was still gross.

IMG_0476

And of course the rats had decided that metal wires running through their nest were a nuisance so they chewed through them.

Yep, we had live, bare electrical wires sitting in cellulose insulation and whatever else the rats put in their nests. Now I’m not feeling so friendly about sharing my house with rats. Luckily this didn’t start a fire and luckily The Bathroom Project has expanded to a grade where I found this.